Managing the PF website
This guide explains how you can manage the PF website using its built-in content management system (CMS). The guide features 3 sections:
Getting started
Logging in to the PF CMS — and getting back to it
Knowing your CMS
An overview of the PF website CMS features and sections
Creating and managing your content
How to create and edit the PF website's content
Adapted for Palazzo Falson by gyro360
(February 2023)
Getting started
Taking control of the PF website content starts with accessing its built-in content management system (CMS for short). And that process usually starts with an email from your website designer (yours truly).
When you click on the link in the email, you’ll be taken to the PF website’s CMS — which, at first, will look just like your new website. Except now, you should see a grey bar across the bottom, containing a simple form, like so:

Just fill in the required fields to create your account, and log in.
Now, your content management system should look just like the PF website — except there’s a toolbar with browser-like tabs along the bottom of the screen, labeled Pages, Collections, and Forms, plus a series of icons like so:

You can return to your site’s content management system by simply typing the URL, then adding ?edit at the end. So, since the Palazzo Falson website’s URL is currently palazzofalson.webflow.io, just go to palazzofalson.webflow.io?edit to log in and start editing.
Please note that once the website is made public in a few weeks' time, the url will change to www.palazzofalson.com so to log in to the Editor, you'd need to go to www.palazzofalson.com?edit
When you return to your site later, you may see a little pencil icon with the text 'Edit site' in the lower right of your browser window, which you can click to hop into your CMS. Rest assured that only those with access to the CMS will see this icon!
With the basics out of the way, let's dig into the CMS itself.
What's a CMS?
In the world of web design, CMS stands for content management system, and as the name suggests, it's a system for managing the content of the PF website.
A CMS is used to enable clients maintain their websites with a high degree of independence and publish new content within a consistent design.
What your CMS can do
Your CMS allows you to edit most existing content on the PF website, including text (or "copy"), images, buttons, links, etc. It also allows you to create some new pages through Collections.
What are Collections?
A Collection is like a database — it's where content can be stored and dynamically referenced throughout a project. Different Collections signify different content types (e.g. Exhibitions, Projects, and Books); an individual piece of content within a Collection is called a Collection item (e.g. Picasso Mirò Exhibition, Notarial Archives, and The Silver of Malta book; individual pieces of data within a Collection item are called fields (e.g. Book title, Year of Publication, and Price).
Getting to know your CMS
Now that you’ve created an account for your site’s CMS and know how to get back in to it anytime, let’s get to know the interface itself.

Pages tab
The Pages tab, as you might imagine, contains a list of your site’s pages. It’ll be divided into at least two sections:
Static pages: These are pages built outside of your Collections e.g., the Gustav Café, Join & Support, and Plan Your Visit pages.
Collection pages: These are pages generated from your Collections (databases), and include pages such as The Collection, Publications, and Exhibitions. These are listed with their Collection name.

What you can do in the Pages tab
The Pages tab allows you to do several things:
Search for a page by name: Type a page’s name into the search bar to find it. Note that this is exact-match search, and it only searches the page’s name, so you’ll need to enter a word or words that appear in the page’s name exactly.
Go to a page: Just click the page name in the list to collapse the Pages tab and view the page. Once you’re there, you can add and edit content to the PF website just like writing in a text editor.
Manage page settings: When you hover your cursor over a page in the list, you’ll see a button labeled “Settings” appear. There, you can manage vital page settings like SEO meta title and description, Open Graph title and description, and Open Graph image url.
Managing page settings
Because these page settings are so important for search and social, let’s dig a little deeper into what each of these settings actually means, and how you can make the most of them.
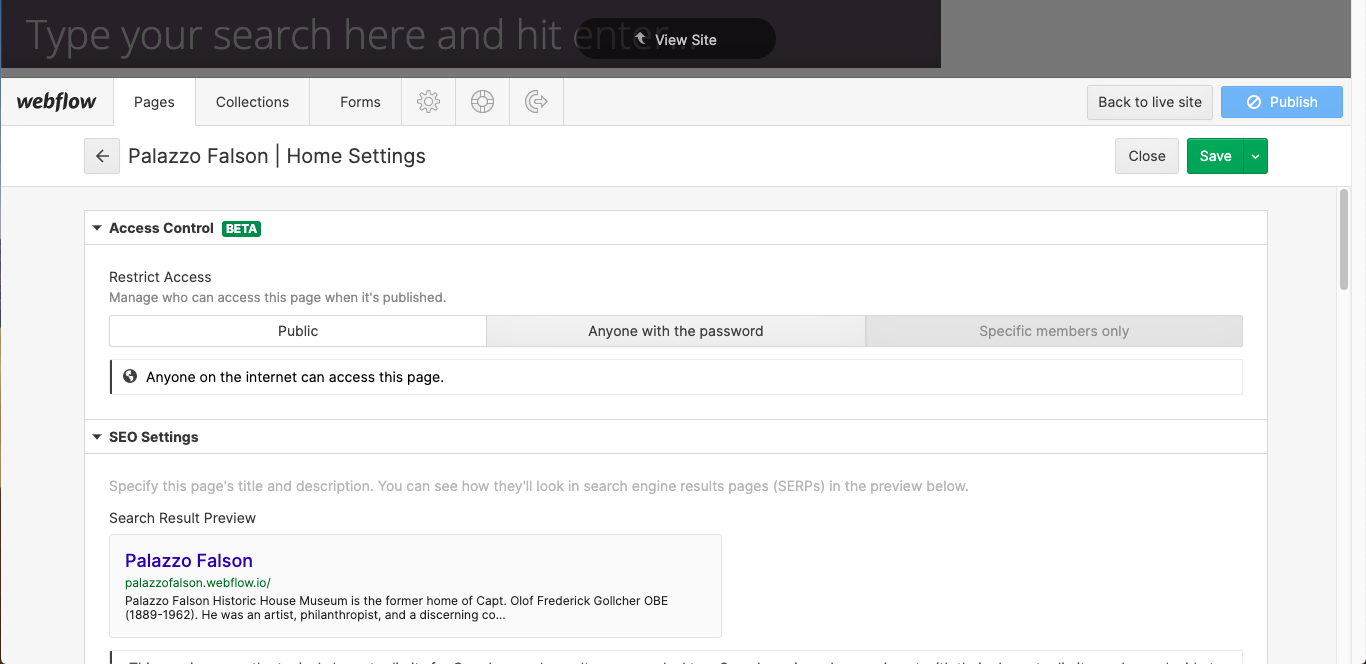
SEO Settings
SEO stands for “search engine optimization”. It’s the practice of building and improving websites in order to improve their chances of being found through search engines like Google, etc. In each page’s settings, you can create and edit the following page-specific SEO settings:
Meta title: A page’s title plays a very important role in its visibility and performance in search engines, both because it (a) tells search engines what the page is about and (b) is what search engine users will click on to reach your site. Be sure to include the types of words people use to describe your business in the title. Ideally, a page’s title should be about 55 to 60 characters long.
Meta description: The description allows you to add a little more detail about your page (about 150 characters of it) – this is also important for search. The Search Result Preview sections shows you what the content you’ve entered will look like on a Google search results page. If any of your text gets cut off in the preview, you’ll want to trim your text to fit.
Open Graph (OG) settings
Open Graph settings are very similar to SEO settings, except that they’re used by social networks like Facebook, Twitter, and LinkedIn. If you use any of these social networks, you’ve seen Open Graph at work many times.
In most cases, you can just tick the checkbox to use the same content as your SEO title and description. But feel free to customize it, if you’d like.
Although Open Graph allows you to specify the URL of an image to be displayed along with your title and description, you'll need to get in touch so I can upload the image and provide you with the link.

Collections tab
The Collections tab is very similar to the Pages tab, but it only lists your Collection content — the stuff created with the CMS. When you click on a Collection, you’ll be taken to a new tab with a list of all the items in the Collection.


To start creating a new item within this Collection, click the + New button and fill out the item’s various fields, paying close attention to the help text and other requirements for each.

What you see within an individual Collection item will change based on the structure of the Collection it belongs to, but you’ll see several elements over and over again:
Back button: Click this to go back to the list of items in this Collection.
View item button: This light grey button collapses the CMS to show you the item you’re currently viewing right on your live website. If you’d like, you can edit its contents there instead of in this panel.
Status: Shows the current status of the item you’re viewing. Statuses include Published, Not Published, and Draft.
Draft checkbox: Tick this checkbox if you aren’t finished creating or editing the current item. Anything that isn’t marked as a draft will be published when someone clicks the Publish button!
Changelog: As you make changes within your CMS, it will record the number of items and pages you’ve changed until you click Publish. You can click on the changelog to see a list of items and pages that have unpublished changes, along with who made them, if you have fellow CMS users.
Back to live site: Click this to view the PF website. You can use any links on the PF website to move between pages in this view. Click on the Edit site button in the bottom right of your browser window to go back to the Editor interface.
The Save and Publish buttons should be fairly self-explanatory. Just note that you’ll need to click Publish twice to confirm your action.
How publishing works in your CMS
Important: Every time you click Publish in your CMS, the whole website gets republished. If you think that others (including yours truly!) are working on the site when you're ready to publish, you may want to ask them if they're ready for their changes to go live.
Forms tab
Here you’ll be able to view some basic information from forms people have submitted, but it’s also useful as a place for you to download the complete form data if you wish to do so. In the downloaded CSV file (a format that works with all the major spreadsheet apps), you’ll be able to see all the submitted info.

What about those icons?
After the Pages and Collections tabs, you’ll see three icons. From left to right, these are:
Account
Shows information about your CMS account, including the associated email, and your photo, if you’ve uploaded one. If you haven’t, you can upload one here.
Help
Provides answers to a few common questions about using the CMS.
Log out
Logs you out of the CMS to view your site as anyone else (non-editors) would.
What's SEO?
SEO stands for "search engine optimization" and, simply put, it's a group of practices designed to ensure that people can find your content when they search for topics included in the PF site on Google and other search engines.
Your CMS allows you to customize the "meta title" and "meta description" — two of the most important SEO elements — for every page and Collection on the PF website.
Creating and managing content
Your CMS gives you two ways to edit content that’s already on your site:
1. Right on your live web page
2. Within your Collection items tab
I'll walk you through both (extremely simple) ways to edit, starting with on-page editing.
On-page editing
Editing right on the page is pretty intuitive with your CMS, but there are a few things to know.
Editing text
When you first log in to your CMS, you’ll see your live website with the CMS panel (the grey bar) collapsed at the bottom of your screen. If you see some text you want to edit, just hover your cursor over it. If a light grey outline with a pencil icon in the upper right appears, you can edit that content. Just click into the box and start typing! Editing text works just like it does in Microsoft Word or Google Docs.

To style text, first select it. A grey toolbar will then pop up, giving you the following options:
B to bold
I to italicize
Chain link icon to insert a link
On non-Rich Text content
Wrap with span ignore
xA to clear formatting
On Rich Text content
H1–H6 to create the various levels of headings. The number indicates the level of importance of each heading, with H1 being most important, and H6 the least important. As things currently stand, I doubt this functionality will be needed, but it's there if it is.
“ to create a block quote. This is best used for lengthy quotations.
You can also style text with the following key combinations:
Command/Control + B to bold
Command/Control + I to italicize
Command/Control + K to insert a link
Inserting links
Your CMS allows you to add a variety of link types to achieve various different functionalities.

When you go to insert a link, the toolbar defaults to entering a URL to link to, but if you click the link icon on the left, you can select from several other options:
External: links a visitor to another page on the web, often on another website, but you can also use this to link to another page of your own site.
Page: links a visitor to another page of your site. You’ll see a dropdown list of your site’s pages listed here.
Section: links a visitor to another section of the same page they’re currently viewing. You’ll see a dropdown list of your page’s sections listed here.
Email: links a visitor to their default email app so they can write an email to the address you specify.
Tel: allows a visitor to place a call to the phone number you specify. This is especially useful for people visiting your site from a mobile device.
Each link type offers its own customisation options. Click the gear icon to see what’s available for your current link type.
Linking to PDF files
There is no option to link to a pdf file from the Editor yet, but there is a workaround that I can implement (as can be seen, e.g., on the Scent Bottles Exhibition page). If you require this functionality, just drop me a line.
More text editing options @@@@@@@@@@
Some areas of text on the FPM website (typically longer passages) will allow for additional options.
When you press enter/return to start a new paragraph, you may see a small + icon. Click it to open the toolbar and see the following options.
Allows you to upload an image.
Allows you to insert a video. This must be a video hosted on a platform like YouTube or Vimeo — you can’t upload a video file from your computer.

Allows you to embed “rich media,” via a link. There are all sorts of objects you can embed using this feature, but here a few of the most popular:
Imgur albums
Google maps
Scribd books
SlideShare presentations
Giphy GIFs
SoundCloud audio

Allows you to add a bulleted list.

Allows you to add a numbered list.
Everything you’ve just read about editing text on the page also applies when you’re in the Items tab of the CMS.
Editing buttons

You can also edit buttons in the CMS. Just hover your cursor over the button and look for a gear icon in the upper right. Click the gear icon and you’ll see two options:
Edit link settings lets you update the page the button takes viewers to.
Edit text lets you change the text within the button.

Editing images

You can also replace images on static pages with the CMS. Just hover your cursor over the image you want to update, then click the picture icon. This will open your computer’s file finder, where you can select any image you’d like. Make sure to use the standard sizes we agreed to for each type of image, as listed below under the title Standard image sizes for the PF website. To replace images on Collection pages, you need to access the specific Collection item via the Collection tab.
Managing Collection items in bulk


Sometimes you'll want to delete, archive, or publish several items all at the same time. To do this you need toclick the Select... button to change the status of multiple items. This can be especially handy if you want to publish multiple connected connected pieces (such as a series of books) all at once.
Creating new content
You can use your CMS to produce new content through any of your Collections, so it’s super easy to create a new Collections page!
This should all be fairly intuitive, and the labels and descriptive text for each field should also help you out immensely. But there are a few things worth calling out:
Items followed by a red asterisk, as shown below, are mandatory. Non-mandatory fields can be left empty if no data exists for that field.

The Name and Slug fields
The Name field and Slug field are both mandatory.
In most collections, the Name field is used to display the item's title on specific pages of the PF site, while in the Treasures of Malta collection, for example, it is used as a reference for CMS editors when editing the ToM Collection and does not actually show up on any web pages.
The Slug field is used for the URL of a specific Collection item page (see below). It is best practice to copy the text from the Name field and paste it into the Slug field (it will be changed to lower case, and spaces replaced by hyphens) and edit out any text that wouldbe superfluous in a URL, such as "the", "a", etc.

Image fields
Anywhere you see “Drag & Drop Image Here”, you’re looking at an image field. You can either drag an image from your computer into the CMS, or click the “Upload an Image” link to upload it through your computer’s file management system.
Note that the CMS will not accept image files over 4MB or pdf files over 10MB. If your file is bigger than that, you can use Photoshop to get your files under that threshold. Make sure the image size is according to the standard image sizes list below, is set at a resolution of 72dpi, RGB mode, and saved in .jpeg format at highest quality (or .png if it contains transparency). This should do the trick, but if not, re-save as a .jpeg at a lower quality level.
In the unlikely case that this is not enough, you can use online tools such as TinyPNG or Compressor. Just keep in mind that the larger the image, the longer it takes to load, so try to get your images as small as possible without losing quality.
It’s also up to you to ensure that you have the right to use any images on the PF website.
Standard image sizes for FPM website
Square tiles: 512 x 512 px
Full width images: 2048 px width
OpenGraph/Search images: 1200 x 630 px
Video field
The video field lets you add a video to your new content. It works by pulling your content from a public video host like YouTube or Vimeo, so you can’t just upload a video file. If you have a video file you want on your site, upload it to the PF YouTube channel (or another service such as Vimeo), then just copy and paste the URL into the Video field. Note: You don’t need the embed code generated by services like YouTube, just the URL.
Switch field
The Switch field is a simple on/off toggle that enables or disables functionality on the PF website. For example, for a Collection item (e.g. a new edition of Treasures of Malta) to be featured on the homepage, the <homepage highlight=""> switch needs to be set to "on" — you will know it's on as the switch background changes from gray to blue.</homepage>
When building the PF website, a design decision was made (which is subject to change in future) to have three items highlighted on the homepage at any one time. This means that any new homepage highlight item will replace a current one. To remove an item from the homepage, simply set its <homepage highlight=""> switch to "off" (switch background changes from blue to gray).</homepage>
Managing your editorial workflow
If you’re the only person working with the CMS on the PF website, you’ll get along just fine writing, editing, and publishing, all within the CMS. But if your writing and editing team is larger than one, you’ll probably want to use a different tool for writing, sharing, editing, and collaborating on content. There are two main reasons for this: Most writing tools offer more detailed collaboration and editing options, like track changes and commenting. It's also always good to have backup copies of anything you publish on the FPM website (just in case someone accidentally deletes something).
Text editing tools
Pay attention when copying and pasting rich text as there is the tendency of formatting being lost. Google Docs tends to preserve formatting much better than Microsoft Word. Rich text fields are used for the body text of Collection items.
Happy editing!
I hope everything was clear and that you find using the Editor straightforward. Don't forget there's a Help section in the Editor, and if there's an issue that's vexing you, or have an idea related to the CMS or the site in general, just give me a shout. Happy editing!
Pro tip: write longer content outside the CMS
For shorter content, you can write and edit right on your live website.
But for longer content that needs a few extra eyes, it's often better to write, collaborate, and edit in a separate app, and then copy/paste your content into the CMS when you’re ready to publish.
This makes collaboration easier, and Google Docs works particularly well because its heading and formatting options carry right over to the CMS.
Apart from this, it's always a good idea to have a backup of your content, just in case. Which means, actually, that it would be a good idea to also create shorter content outside the CMS. Sticking to a standardized file-naming convention and file organization system (meaningfully-titled folders in a logically-organized hierarchy) is also highly recommended... leave it to the person with highest OCD levels in the office (and I mean this with the utmost seriousness and respect!)
Editing Collection text
If you edit content that comes from one of your CMS Collections, all other instances of that text will automatically update across your site (except on static pages).
For example, if you edit the title of an exhibition on the Exhibitions index page, the title will update on the exhibition's page, as well as anywhere else it appears on the site, e.g. in search results.
Editing URLs
To continue with the above example, let's say you edited an exhibition's title, and now you realize you want to update the URL to match the new title... good thinking, and the good news is that you can do this in the CMS.
However, this will break any hard links to the old URL! I have not used hard links between pages in the website, so this will have no adverse effect on the PF site. However, if, for example, a sister site, such as FPM's, has a hard link on one of their pages to a page on the PF website and you change the URL, then that URL will no longer work. Kapixx?
Pro tip: Non-breaking space and non-breaking hyphen
To create a non-breaking space, press Shift + Space when adding spaces between words you want to keep together. Be careful when using manual breaks or non-breaking spaces as they might solve a text issue on larger screens but possibly cause other issues on smaller screens.
If you need a non-breaking hyphen, e.g. to keep a hyphenated word pair on the same line, copy and paste this:
‑
You're welcome :)
Best practice
It is best practice (actually it's imperative!), whenever creating or editing a page, to view it immediately on desktop, tablet, and phone after publishing so any issues can be corrected at once.
Page editing history

The editing history of each page can be found at the bottom of the Editor window. Although it does not provide detailed information, it could nevertheless be useful in certain instances.